Search Results
756 results found with an empty search
- Mason Jar Cake Class
Mason Jar Cake Class Mason Jar Cake Class This is a paid class. To watch this class and receive access to the recipes you will need to purchase video on demand access. ! Widget Didn’t Load Check your internet and refresh this page. If that doesn’t work, contact us.
- Old Fashioned Easter Bunny Cake
ALL RECIPES BAKING RECIPES CANDY RECIPES COCKTAIL RECIPES COOKING RECIPES Create Account Questions Recipes Video Classes Zoom Classes Old Fashioned Easter Bunny Cake 1 hour 12 Recipe you are creating: Old Fashioned Easter Bunny Cake Learn how to make an Old Fashion Easter Bunny Cake! This cake was popular in the 70's and is making a come back! Recipe Ingredients: 1 cake mix 2 eggs Oil or butter (following box instruction) Cooking spray or butter to coat pan Buttercream Icing Recipe Directions: Supplies: (2) 8" round cakes flavor of your choice 6 cups of the buttercream of your choice 1 bag of flaked coconut Candy melts for eyes, whiskers, mouth and brows Pink gel coloring Foam core board To make an Old Fashioned Easter Bunny Cake, here are the steps: Preheat your oven according to the cake mix instructions. Grease and flour two 8" round cake pans. In a mixing bowl, combine the cake mix, water, oil, and eggs, then beat until smooth. Pour the batter into the prepared cake pans and bake according to the package instructions. Once the cakes are baked and cooled, frost the cake with the frosting. Mix coconut flakes with a few drops of pink food coloring to create a pink "fur" for the bunny. Sprinkle the colored coconut flakes over the frosted cake. Use melted coating chocolate to pipe a nose, mouth and the eyes and the whiskers on parchment. Once set you can peel off parchment and place on your cake! Watch the video towards the bottom of the page for full cake decorating instructions. Your Old Fashioned Easter Bunny Cake is now ready to enjoy! Be sure to watch the full step-by-step video at the bottom of the page! You Might Also Like: Tags: how to make an easter bunny cake, how to make a bunny cake, easter cakes so yummy, easter cakes ideas, easter bunny cake tutorial, bunny cake design, bunny cake tutorial, bunny cake decoration, how to make easter bunny cake, easter bunny cakes, easter cake recipes, easter cake, easter, easter bunny, cake decorating tips, how to make a easter bunny cake, easter recipes 2024, easter desserts recipes, bunny cake, easter bunny cake, cake decorating, easter cakes, easter dessert Categories: Cake Decorating, Cake
- Pink Lemonade Cookies
ALL RECIPES BAKING RECIPES CANDY RECIPES COCKTAIL RECIPES COOKING RECIPES Create Account Questions Recipes Video Classes Zoom Classes Pink Lemonade Cookies 10 mins 2 dozen Recipe you are creating: Pink Lemonade Cookies Pink Lemonade is a staple in our house. We love it in the summer and it's great in cocktails. It's even better as a delicious cookie dessert. These cookies are quick and easy to make because they use a boxed cake mix. The pink comes from strawberry cake and the yellow comes from lemon cake. These cookies are a lot like the chocolate scratch crinkle cookies I make at the holidays but with less work! Enjoy! Recipe Ingredients: 1 box Strawberry Cake Mix 1 box Yellow Cake Mix 4 large eggs, divided 2/3 cup vegetable oil Juice of 1 lemon juice Zest of half a lemon 2 teaspoons lemon bakery emulsion 2 teaspoons strawberry bakery emulsion 2 cups powdered sugar Recipe Directions: In a bowl, whisk 2 eggs, 1/3 cup oil, 2 teaspoons strawberry bakery emulsion and half the lemon juice. Stir in strawberry cake mix. Mix until combined; set aside. In another bowl, whisk 2 eggs, 1/3 cup oil, 2 teaspoons of lemon bakery emulsion and the rest of the lemon juice. Stir in lemon cake mix. Mix until combined. Refrigerate both mix 30 minutes. Prepare a plate with the powdered sugar. Once mix has been refrigerated, using a cookie scooper, scoop half a scoop of strawberry mix and then fill the other half of the scoop by scooping from the lemon mix. Drop onto powdered sugar plate and roll into a ball in the powdered sugar. Place on a cookie sheet lined with parchment. Cookies will spread so leave enough space between cookies to allow for this. Bake at 350 degrees for 10-15 mins depending on the size of your cookie balls. Let cool and enjoy! Variations: Use any type of cake mix and flavor combinations to create more delicious variations. You Might Also Like: Cookie Baking & Cookie Decorating Classes You Might Like! Tags: Pink Lemonade Cookies, Cookie Recipe, Cookies, How to make pink lemonade cookies, Pink Lemonade Cookie Recipe, Cookie Categories: Cake, Cookie, Kids, Cookies
- 3D Cookies Sugar Cookies
ALL RECIPES BAKING RECIPES CANDY RECIPES COCKTAIL RECIPES COOKING RECIPES Create Account Questions Recipes Video Classes Zoom Classes 3D Cookies Sugar Cookies 15 mins 3 Dozen 5" Cookies Recipe you are creating: 3D Cookies Sugar Cookies The perfect sugar cookie. It doesn't spread and is ideal for all your cookie projects! Recipe Ingredients: 2 cups unsalted butter 2 cups bakers sugar 2 eggs 1 teaspoons vanilla extract 2 teaspoons Lemon Extract (LorAnn Bakery Emulsions) 5 1⁄2 to 6 cups all purpose flour 3 teaspoons baking powder 1 teaspoon salt Recipe Directions: In a 5qt mixer or a large bowl, cream the butter and sugar until fluffy. Add the eggs, mix. Add vanilla and Lemon extract, mix. In a separate bowl, mix the flour, baking powder and salt together. Gradually add to the butter mixture until incorporated. TIP: For 3D cookies it is best to hold back a bit on the flour (5 1⁄4 or 5 1⁄2 cups). Scrape bowl and mix until dough comes together. Wrap dough in plastic wrap and refrigerate for at least 1 hour. Roll out cookies on parchment paper, cut shapes leaving space between the cookies, then place the parchment paper with the cookies onto a cookie sheet. Bake cookies at 350 degrees in a regular oven or 300-325 degrees in a convection oven until golden brown around the edges. You Might Also Like: Learn how to make our no-spread sugar cookie recipe! Cookie Baking & Cookie Decorating Classes You Might Like! A note about ingredients used in our recipes: When creating our recipes we use the following unless otherwise noted in the recipe: Eggs = Large Eggs All Purpose Flour = Unbleached All Purpose King Arthur Flour or Unbleached All Purpose King Arthur Flour Organic Bread Flour = Unbleached King Arthur Bread Flour or Unbleached King Arthur Bread Flour Organic Whole Wheat Flour = 100% Whole Grain King Arthur Whole Wheat Flour Pastry Flour = Bob’s Red Mill Unbleached White Fine Pastry Flour Almond Flour = Bob’s Red Mill Super-Fine Almond Flour Tapioca Flour = Bob’s Red Mill Tapioca Flour (Tapioca Starch) Sour Cream = Full Fat Sour Cream Yogurt = Full Fat Yogurt Milk = As indicated or if Milk is just listed you may use 1%, 2% or Whole Milk Butter = Unsalted Sweet Cream butter unless otherwise noted Oil = Either Olive oil or Vegetable oil unless otherwise noted Tags: Dessert, Baking, Cookies, Holiday Baking, Sugar Cookies, sugar cookies, no spread sugar cookies, christmas cookies, how to make sugar cookies, easy sugar cookies, sugar cookies recipe, how to make easy no spread sugar cookies, cookies, baking, royal icing, how to make no spread sugar cookies, cooking, cookie recipe, best sugar cookies, easy cookie recipe, cookie decorating, decorated cookies, how to bake sugar cookies Categories: Cookie Decorating, Cake Decorating, Sugar Cookies
- Beer Can Chicken
ALL RECIPES BAKING RECIPES CANDY RECIPES COCKTAIL RECIPES COOKING RECIPES Create Account Questions Recipes Video Classes Zoom Classes Beer Can Chicken 20 mins 8 Recipe you are creating: Beer Can Chicken Fire up that grill! Beer can chicken adds flavor through out the chicken and is great anytime of the year. Recipe Ingredients: 1/4 cup kosher salt 1/4 cup dark brown sugar 1/4 cup sweet paprika 2 tablespoons freshly ground black pepper 2 teaspoons vegetable oil 1 (3 to 4 pound) whole chicken, patted dry 1 can (12 or 16 ounces) good quality beer Fresh herbs of your choice for placing in the beer can Recipe Directions: Preheat a gas grill to medium or prepare a charcoal grill. To prepare rub: To a small bowl, add salt, brown sugar, paprika, and pepper, and whisk to fully incorporate. To prepare chicken: Rotate and tuck the chicken’s wingtips back. Using a silicone brush, coat chicken with a thin layer of oil and coat with 2 tablespoons barbecue rub, ensuring skin and cavity are fully covered. Open can of beer, and pour out half, leaving remaining half in can. You will need to make the opening of the can larger or piece the top several times to allow more steam to escape during cooking. Add 2 tablespoons barbecue rub to beer in can and place all fresh herbs in can as well. To a roasting pan place can in center, and place chicken upright on top of can, so it sits upright in chicken’s cavity. To cook chicken: Place chicken on grill grates, and cover. Cook chicken, until skin is well browned, about 30 to 35 minutes. Use pan drippings to baste chicken every so often. Cook until an instant-read thermometer inserted into thickest part of thigh reads 165°F degrees, about 1 and 1/2 hours total. If skin begins to brown before chicken is thoroughly cooked, tent loosely with aluminum foil. When done remove chicken from grill or oven and allow to rest covered loosely with aluminum foil, 15 to 20 minutes. Carefully remove chicken from can and place it on a cutting board. Cut chicken up as you'd like and serve . You Might Also Like: A note about ingredients used in our recipes: When creating our recipes we use the following unless otherwise noted in the recipe: Eggs = Large Eggs All Purpose Flour = Unbleached All Purpose King Arthur Flour or Unbleached All Purpose King Arthur Flour Organic Bread Flour = Unbleached King Arthur Bread Flour or Unbleached King Arthur Bread Flour Organic Whole Wheat Flour = 100% Whole Grain King Arthur Whole Wheat Flour Pastry Flour = Bob’s Red Mill Unbleached White Fine Pastry Flour Almond Flour = Bob’s Red Mill Super-Fine Almond Flour Tapioca Flour = Bob’s Red Mill Tapioca Flour (Tapioca Starch) Sour Cream = Full Fat Sour Cream Yogurt = Full Fat Yogurt Milk = As indicated or if Milk is just listed you may use 1%, 2% or Whole Milk Butter = Unsalted Sweet Cream butter unless otherwise noted Oil = Either Olive oil or Vegetable oil unless otherwise noted Tags: How to make beer can chicken, Beer Can Chicken Recipe, Grilled Beer can chicken Categories: BBQ, Chicken
- Holiday Decorated Cupcakes
ALL RECIPES BAKING RECIPES CANDY RECIPES COCKTAIL RECIPES COOKING RECIPES Create Account Questions Recipes Video Classes Zoom Classes Holiday Decorated Cupcakes 20 mins 3 dozen Recipe you are creating: Holiday Decorated Cupcakes Who doesn't love fun holiday cupcakes? These are so easy to make and feature fun sugar decor. This is a great project for the whole family! Recipe Ingredients: 1 lbs 5 oz bakers sugar 1 lbs 4 oz cake flour .75 oz baking powder 1/2 oz of salt 9 oz buttermilk 5.25 oz whole eggs 6.75 oz of egg whites .75 oz vanilla 12 oz high ratio shortening Decorations are available at Lucks.com : Penquin Decorations Gingerbread Men Decorations Candy Cane Decorations Christmas Ball Decorations Christmas Light Decorations Holiday Fusion Sprinkle Mix Holly Berry Sprinkle Mix Recipe Directions: Preheat over to 325°F. Line your cupcake pans. Dry Ingredients: Sift together first 4 ingredients in a bowl, set aside. Wet Ingredients: Combine the next 4 ingredients in a bowl, set aside. In the bowl of a Kitchen Aid equipped with a paddle attachment, add shortening and blend with dry ingredients and half of your wet ingredients. Mix on medium speed, scraping the bowl periodically until smooth. Add remaining ingredients in 3 additions alternation dry with wet. Scoop batter into your lined cupcake pans using an ice-cream scoop. Bake 18-20 mins or until a toothpick inserted into the center comes out clean Buttercream: Use either our our Swiss Meringue Buttercream or our American Buttercream recipe. Place the icing into a piping bag fitted with a 1M tip or a round tip and pipe a swirl. Decorate with fun sugar Decons from Lucks. For jumbo size cupcakes bake 28-30 mins at 350°F You Might Also Like: Classes you might like! Tags: Holiday Cupcakes, Sweet, Dessert, Cupcakes, How to bake cupcakes, Cupcake Recipe Categories: Cake, Cupcake, Cake Decorating, Class
- Dairy-Free Pineapple Sorbet
ALL RECIPES BAKING RECIPES CANDY RECIPES COCKTAIL RECIPES COOKING RECIPES Create Account Questions Recipes Video Classes Zoom Classes Dairy-Free Pineapple Sorbet 5 mins 1 Ninja Creami Cup Recipe you are creating: Dairy-Free Pineapple Sorbet Looking for a tropical escape in a bowl? Try making our dairy-free pineapple sorbet! It's the ultimate dairy-free, vegan dessert that’s super easy to whip up and packed with all the juicy sweetness of fresh pineapple. This smooth and creamy sorbet is perfect for hot days or when you need a light, refreshing dessert that won’t weigh you down. Why Make Your Own Dairy Free Sorbet? Making your own sorbet at home means you control the ingredients—so no weird additives or extra sugars! Plus, it’s a great option for anyone with lactose intolerance or those following a plant-based diet. Sorbet is naturally low in fat, making it a guilt-free indulgence. And let's be real—what's better than the satisfaction of making something delicious from scratch? Recipe Ingredients: 1 Fresh Whole Pineapple including juice and pulp Silk Coconut Milk in the carton or in the can either works for this recipe (Sweetened or Unsweetened, if using unsweetened you may want to add a 1 tbsp of honey) Equipment: Ninja Creami Machine Or Food Processor or High Powered Blender like a Vitamix or Ninja Blender Recipe Directions: Add 5 1/2 ounces of coconut milk into your blender and then add in all your cut up pineapple with the juice and blend it all together. If using unsweetened coconut milk or if you like things a little sweeter then add in the 1 tbsp of honey and give it another quick blend to combine. After blending pour the mix into your Ninja Creami cup and freeze for 24 hours. Once the 24 hours are up you can take your Ninja Creami cup out of the freezer and put it into your Ninja Creami machine and put the setting on sorbet and wait for it to creamifi. When the creamification is over, take your sorbet out of the Ninja Creami and see if it's smooth enough. You might need to re-spin a few times. If not then enjoy your freshly homemade dairy-free pineapple sorbet. No Ninja Creami Machine? No problem! Follow all the steps above and place your mixture in freezer safe bag and freeze for 24 hours. Once frozen, place in a food processor or high-powered blender, like a Vitamix. Run the mixer on high, stopping to scrape the sides with a spatula every minute. Continue to blend until the pineapple is a crumb-like texture, then add the honey. With the processor running on high, continue to blend until the pineapple sorbet becomes smooth and creamy, about 5 minutes. Scoop and serve the sorbet immediately! Sorbet is best served immediately but can be stored in a freezer-safe container for 1-2 weeks. It will get icier and harder the longer it sits in the freezer. You Might Also Like: #DairyFreeSorbet #VeganPineappleSorbet #HealthyDesserts #HomemadeSorbet #NinjaCreamiRecipes #SummerTreats #VeganDessertIdeas #DairyFreeDessert #EasySorbetRecipes #SummerRecipes #HealthyDessert #FruitSorbet #RefreshingDessert #VeganDessert #DairyFree #EasyRecipes Tags: sorbet recipe, how to, how to make sorbet, healthy recipe, healthy desserts, fruit sorbet recipe, fruit sorbet ninja creami, pineapple sorbet, dairy free pineapple sorbet, how to make pineapple sorbet, how to make dairy free pineapple sorbet, dairy free sorbet, healthy recipes vegetarian, sorbet recipe with blender, how to make sorbet without an ice cream maker Categories: Frozen Dessert
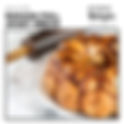
- Banana Pull Apart Bread
ALL RECIPES BAKING RECIPES CANDY RECIPES COCKTAIL RECIPES COOKING RECIPES Create Account Questions Recipes Video Classes Zoom Classes Banana Pull Apart Bread 20 mins 24 Recipe you are creating: Banana Pull Apart Bread You'll go bananas over this bread! Our yeast based pull-apart bread with bananas and caramel is like monkey bread and quick and delicious ! It combines the sweetness of ripe bananas with the fluffy texture of yeast bread. Double the recipe for a bundt pan version or use a sheet pan per the recipe. Whip it up for brunch or dessert or really anytime of the day! Recipe Ingredients: 2 teaspoons active dry yeast 1 tablespoon plus 1/2 cup packed brown sugar, divided 1 cup warm 1% milk (110°) 1 cup mashed ripe bananas (about 2 large) 1 large egg, room temperature 2 tablespoons butter, melted 1 teaspoon salt 1 teaspoon ground cinnamon 5-1/4 to 5-3/4 cups all-purpose flour 2 teaspoons Madagascar vanilla or vanilla bean paste GLAZE: 2/3 cup packed brown sugar 1/2 cup heavy cream 6 tablespoons butter, cubed COATING: 3/4 cup chopped pecans, toasted (optional, I don’t like nuts so I didn’t use them) 6 tablespoons butter, melted 1-1/4 cups sugar 2-1/2 teaspoons ground cinnamon GARNISH: 1 large banana, sliced Recipe Directions: Prepare dough according to video instructions. You Might Also Like: Check out these bread baking classes! A note about ingredients used in our recipes: When creating our recipes we use the following unless otherwise noted in the recipe: Eggs = Large Eggs All Purpose Flour = Unbleached All Purpose King Arthur Flour or Unbleached All Purpose King Arthur Flour Organic Bread Flour = Unbleached King Arthur Bread Flour or Unbleached King Arthur Bread Flour Organic Whole Wheat Flour = 100% Whole Grain King Arthur Whole Wheat Flour Pastry Flour = Bob’s Red Mill Unbleached White Fine Pastry Flour Almond Flour = Bob’s Red Mill Super-Fine Almond Flour Tapioca Flour = Bob’s Red Mill Tapioca Flour (Tapioca Starch) Sour Cream = Full Fat Sour Cream Yogurt = Full Fat Yogurt Milk = As indicated or if Milk is just listed you may use 1%, 2% or Whole Milk Butter = Unsalted Sweet Cream butter unless otherwise noted Oil = Either Olive oil or Vegetable oil unless otherwise noted Tags: Banana Pull Apart Bread, Monkey Beard, Monkey Bread Recipes, Rising Dough Bread Recipes, bread recipe, banana bread recipe, how to, banana bread, pull apart bread, how to make banana bread, easy banana bread, banana recipes, homemade bread, bread recipes for breakfast, how to cook, easy recipes, cinnamon rolls, bread recipes for snacks Categories: Yeast Breads, Bread
- Swiss Meringue Buttercream
ALL RECIPES BAKING RECIPES CANDY RECIPES COCKTAIL RECIPES COOKING RECIPES Create Account Questions Recipes Video Classes Zoom Classes Swiss Meringue Buttercream 15 mins 6 cups Recipe you are creating: Swiss Meringue Buttercream Swiss Meringue buttercream is great for frosting cookies, icing cakes, decorating cupcakes and other sweet treats. The recipe in the video will yield 6 cups of silky-smooth Swiss meringue buttercream. Recipe Ingredients: This recipe is part of our Intro to Cake Decorating Class. To get this recipe and more cake recipes take our video on demand cake class today or become a premium all-inclusive member and get access to all of our classes! Recipe Directions: This recipe is part of our Intro to Cake Decorating Class. To get this recipe and more cake recipes take our video on demand cake class today or become a premium all-inclusive member and get access to all of our classes! You Might Also Like: Classes you might like! Tags: Swiss Meringue Buttercream, Buttercream, Dessert, Cake, Cake Recipe, Cake Decorating, Cake Baking, Buttercream Recipe, Frosting Recipe, Icing Recipe, SMBC Recipe Categories: Cake Decorating, Cake, Frosting
- Beef Enchiladas
ALL RECIPES BAKING RECIPES CANDY RECIPES COCKTAIL RECIPES COOKING RECIPES Create Account Questions Recipes Video Classes Zoom Classes Beef Enchiladas 20 mins 8-12 servings Recipe you are creating: Beef Enchiladas Love enchiladas but don't have all day to make them? Our enchilada is full of spicy beef and southwest veggies. We top them with green chili enchilada sauce and cheddar cheese. You won't be spending all day in the kitchen making this savory main dish. Guaranteed to have your family asking for a second helping! Recipe Ingredients: 1 pound lean ground beef Avocado oil 1 package taco seasoning mix 2 tablespoons ketchup 1/2 cup water 1 package frozen southwest vegetables 8 ounces cheddar cheese, shredded 2 cans green chili enchilada sauce 2 packages tortillas (we prefer the low carb) Recipe Directions: Add lean ground beef to frying pan preheated with avocado oil. Fry until the meat is crisp and well browned. Add the taco seasoning and ketchup. Stir in the water. Simmer until well blended. Add the frozen southwest vegetables and stir to incorporate. Remove from heat and allow to cool to room temperature. Preheat oven to 375 degrees. Spray a 9x13 glass pan with cooking spray. Add 1/2 of the shredded cheese to the beef mixture. Place several tablespoons of the meat mixture on the tortilla and roll up. Watch the video to see how to fill and roll the tortilla. Place the enchilada rolls into the greased glass pan. Bake for 20 minutes. Remove from the oven and pour the green chili sauce over the enchiladas. Spread the remaining cheese over the top. Bake for 10 minutes. You Might Also Like: A note about ingredients used in our recipes: When creating our recipes we use the following unless otherwise noted in the recipe: Eggs = Large Eggs All Purpose Flour = Unbleached All Purpose King Arthur Flour or Unbleached All Purpose King Arthur Flour Organic Bread Flour = Unbleached King Arthur Bread Flour or Unbleached King Arthur Bread Flour Organic Whole Wheat Flour = 100% Whole Grain King Arthur Whole Wheat Flour Pastry Flour = Bob’s Red Mill Unbleached White Fine Pastry Flour Almond Flour = Bob’s Red Mill Super-Fine Almond Flour Tapioca Flour = Bob’s Red Mill Tapioca Flour (Tapioca Starch) Sour Cream = Full Fat Sour Cream Yogurt = Full Fat Yogurt Milk = As indicated or if Milk is just listed you may use 1%, 2% or Whole Milk Butter = Unsalted Sweet Cream butter unless otherwise noted Oil = Either Olive oil or Vegetable oil unless otherwise noted Tags: Beef Enchilada, Cooking, Enchiladas, Savory, How to make enchiladas Categories: Beef