Search Results
756 results found with an empty search
- Holiday Decorated Cupcakes
ALL RECIPES BAKING RECIPES CANDY RECIPES COCKTAIL RECIPES COOKING RECIPES Create Account Questions Recipes Video Classes Zoom Classes Holiday Decorated Cupcakes 20 mins 3 dozen Recipe you are creating: Holiday Decorated Cupcakes Who doesn't love fun holiday cupcakes? These are so easy to make and feature fun sugar decor. This is a great project for the whole family! Recipe Ingredients: 1 lbs 5 oz bakers sugar 1 lbs 4 oz cake flour .75 oz baking powder 1/2 oz of salt 9 oz buttermilk 5.25 oz whole eggs 6.75 oz of egg whites .75 oz vanilla 12 oz high ratio shortening Decorations are available at Lucks.com : Penquin Decorations Gingerbread Men Decorations Candy Cane Decorations Christmas Ball Decorations Christmas Light Decorations Holiday Fusion Sprinkle Mix Holly Berry Sprinkle Mix Recipe Directions: Preheat over to 325°F. Line your cupcake pans. Dry Ingredients: Sift together first 4 ingredients in a bowl, set aside. Wet Ingredients: Combine the next 4 ingredients in a bowl, set aside. In the bowl of a Kitchen Aid equipped with a paddle attachment, add shortening and blend with dry ingredients and half of your wet ingredients. Mix on medium speed, scraping the bowl periodically until smooth. Add remaining ingredients in 3 additions alternation dry with wet. Scoop batter into your lined cupcake pans using an ice-cream scoop. Bake 18-20 mins or until a toothpick inserted into the center comes out clean Buttercream: Use either our our Swiss Meringue Buttercream or our American Buttercream recipe. Place the icing into a piping bag fitted with a 1M tip or a round tip and pipe a swirl. Decorate with fun sugar Decons from Lucks. For jumbo size cupcakes bake 28-30 mins at 350°F You Might Also Like: Classes you might like! Tags: Holiday Cupcakes, Sweet, Dessert, Cupcakes, How to bake cupcakes, Cupcake Recipe Categories: Cake, Cupcake, Cake Decorating, Class
- Dairy-Free Pineapple Sorbet
ALL RECIPES BAKING RECIPES CANDY RECIPES COCKTAIL RECIPES COOKING RECIPES Create Account Questions Recipes Video Classes Zoom Classes Dairy-Free Pineapple Sorbet 5 mins 1 Ninja Creami Cup Recipe you are creating: Dairy-Free Pineapple Sorbet Looking for a tropical escape in a bowl? Try making our dairy-free pineapple sorbet! It's the ultimate dairy-free, vegan dessert that’s super easy to whip up and packed with all the juicy sweetness of fresh pineapple. This smooth and creamy sorbet is perfect for hot days or when you need a light, refreshing dessert that won’t weigh you down. Why Make Your Own Dairy Free Sorbet? Making your own sorbet at home means you control the ingredients—so no weird additives or extra sugars! Plus, it’s a great option for anyone with lactose intolerance or those following a plant-based diet. Sorbet is naturally low in fat, making it a guilt-free indulgence. And let's be real—what's better than the satisfaction of making something delicious from scratch? Recipe Ingredients: 1 Fresh Whole Pineapple including juice and pulp Silk Coconut Milk in the carton or in the can either works for this recipe (Sweetened or Unsweetened, if using unsweetened you may want to add a 1 tbsp of honey) Equipment: Ninja Creami Machine Or Food Processor or High Powered Blender like a Vitamix or Ninja Blender Recipe Directions: Add 5 1/2 ounces of coconut milk into your blender and then add in all your cut up pineapple with the juice and blend it all together. If using unsweetened coconut milk or if you like things a little sweeter then add in the 1 tbsp of honey and give it another quick blend to combine. After blending pour the mix into your Ninja Creami cup and freeze for 24 hours. Once the 24 hours are up you can take your Ninja Creami cup out of the freezer and put it into your Ninja Creami machine and put the setting on sorbet and wait for it to creamifi. When the creamification is over, take your sorbet out of the Ninja Creami and see if it's smooth enough. You might need to re-spin a few times. If not then enjoy your freshly homemade dairy-free pineapple sorbet. No Ninja Creami Machine? No problem! Follow all the steps above and place your mixture in freezer safe bag and freeze for 24 hours. Once frozen, place in a food processor or high-powered blender, like a Vitamix. Run the mixer on high, stopping to scrape the sides with a spatula every minute. Continue to blend until the pineapple is a crumb-like texture, then add the honey. With the processor running on high, continue to blend until the pineapple sorbet becomes smooth and creamy, about 5 minutes. Scoop and serve the sorbet immediately! Sorbet is best served immediately but can be stored in a freezer-safe container for 1-2 weeks. It will get icier and harder the longer it sits in the freezer. You Might Also Like: #DairyFreeSorbet #VeganPineappleSorbet #HealthyDesserts #HomemadeSorbet #NinjaCreamiRecipes #SummerTreats #VeganDessertIdeas #DairyFreeDessert #EasySorbetRecipes #SummerRecipes #HealthyDessert #FruitSorbet #RefreshingDessert #VeganDessert #DairyFree #EasyRecipes Tags: sorbet recipe, how to, how to make sorbet, healthy recipe, healthy desserts, fruit sorbet recipe, fruit sorbet ninja creami, pineapple sorbet, dairy free pineapple sorbet, how to make pineapple sorbet, how to make dairy free pineapple sorbet, dairy free sorbet, healthy recipes vegetarian, sorbet recipe with blender, how to make sorbet without an ice cream maker Categories: Frozen Dessert
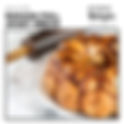
- Banana Pull Apart Bread
ALL RECIPES BAKING RECIPES CANDY RECIPES COCKTAIL RECIPES COOKING RECIPES Create Account Questions Recipes Video Classes Zoom Classes Banana Pull Apart Bread 20 mins 24 Recipe you are creating: Banana Pull Apart Bread You'll go bananas over this bread! Our yeast based pull-apart bread with bananas and caramel is like monkey bread and quick and delicious ! It combines the sweetness of ripe bananas with the fluffy texture of yeast bread. Double the recipe for a bundt pan version or use a sheet pan per the recipe. Whip it up for brunch or dessert or really anytime of the day! Recipe Ingredients: 2 teaspoons active dry yeast 1 tablespoon plus 1/2 cup packed brown sugar, divided 1 cup warm 1% milk (110°) 1 cup mashed ripe bananas (about 2 large) 1 large egg, room temperature 2 tablespoons butter, melted 1 teaspoon salt 1 teaspoon ground cinnamon 5-1/4 to 5-3/4 cups all-purpose flour 2 teaspoons Madagascar vanilla or vanilla bean paste GLAZE: 2/3 cup packed brown sugar 1/2 cup heavy cream 6 tablespoons butter, cubed COATING: 3/4 cup chopped pecans, toasted (optional, I don’t like nuts so I didn’t use them) 6 tablespoons butter, melted 1-1/4 cups sugar 2-1/2 teaspoons ground cinnamon GARNISH: 1 large banana, sliced Recipe Directions: Prepare dough according to video instructions. You Might Also Like: Check out these bread baking classes! A note about ingredients used in our recipes: When creating our recipes we use the following unless otherwise noted in the recipe: Eggs = Large Eggs All Purpose Flour = Unbleached All Purpose King Arthur Flour or Unbleached All Purpose King Arthur Flour Organic Bread Flour = Unbleached King Arthur Bread Flour or Unbleached King Arthur Bread Flour Organic Whole Wheat Flour = 100% Whole Grain King Arthur Whole Wheat Flour Pastry Flour = Bob’s Red Mill Unbleached White Fine Pastry Flour Almond Flour = Bob’s Red Mill Super-Fine Almond Flour Tapioca Flour = Bob’s Red Mill Tapioca Flour (Tapioca Starch) Sour Cream = Full Fat Sour Cream Yogurt = Full Fat Yogurt Milk = As indicated or if Milk is just listed you may use 1%, 2% or Whole Milk Butter = Unsalted Sweet Cream butter unless otherwise noted Oil = Either Olive oil or Vegetable oil unless otherwise noted Tags: Banana Pull Apart Bread, Monkey Beard, Monkey Bread Recipes, Rising Dough Bread Recipes, bread recipe, banana bread recipe, how to, banana bread, pull apart bread, how to make banana bread, easy banana bread, banana recipes, homemade bread, bread recipes for breakfast, how to cook, easy recipes, cinnamon rolls, bread recipes for snacks Categories: Yeast Breads, Bread
- Swiss Meringue Buttercream
ALL RECIPES BAKING RECIPES CANDY RECIPES COCKTAIL RECIPES COOKING RECIPES Create Account Questions Recipes Video Classes Zoom Classes Swiss Meringue Buttercream 15 mins 6 cups Recipe you are creating: Swiss Meringue Buttercream Swiss Meringue buttercream is great for frosting cookies, icing cakes, decorating cupcakes and other sweet treats. The recipe in the video will yield 6 cups of silky-smooth Swiss meringue buttercream. Recipe Ingredients: This recipe is part of our Intro to Cake Decorating Class. To get this recipe and more cake recipes take our video on demand cake class today or become a premium all-inclusive member and get access to all of our classes! Recipe Directions: This recipe is part of our Intro to Cake Decorating Class. To get this recipe and more cake recipes take our video on demand cake class today or become a premium all-inclusive member and get access to all of our classes! You Might Also Like: Classes you might like! Tags: Swiss Meringue Buttercream, Buttercream, Dessert, Cake, Cake Recipe, Cake Decorating, Cake Baking, Buttercream Recipe, Frosting Recipe, Icing Recipe, SMBC Recipe Categories: Cake Decorating, Cake, Frosting
- Beef Enchiladas
ALL RECIPES BAKING RECIPES CANDY RECIPES COCKTAIL RECIPES COOKING RECIPES Create Account Questions Recipes Video Classes Zoom Classes Beef Enchiladas 20 mins 8-12 servings Recipe you are creating: Beef Enchiladas Love enchiladas but don't have all day to make them? Our enchilada is full of spicy beef and southwest veggies. We top them with green chili enchilada sauce and cheddar cheese. You won't be spending all day in the kitchen making this savory main dish. Guaranteed to have your family asking for a second helping! Recipe Ingredients: 1 pound lean ground beef Avocado oil 1 package taco seasoning mix 2 tablespoons ketchup 1/2 cup water 1 package frozen southwest vegetables 8 ounces cheddar cheese, shredded 2 cans green chili enchilada sauce 2 packages tortillas (we prefer the low carb) Recipe Directions: Add lean ground beef to frying pan preheated with avocado oil. Fry until the meat is crisp and well browned. Add the taco seasoning and ketchup. Stir in the water. Simmer until well blended. Add the frozen southwest vegetables and stir to incorporate. Remove from heat and allow to cool to room temperature. Preheat oven to 375 degrees. Spray a 9x13 glass pan with cooking spray. Add 1/2 of the shredded cheese to the beef mixture. Place several tablespoons of the meat mixture on the tortilla and roll up. Watch the video to see how to fill and roll the tortilla. Place the enchilada rolls into the greased glass pan. Bake for 20 minutes. Remove from the oven and pour the green chili sauce over the enchiladas. Spread the remaining cheese over the top. Bake for 10 minutes. You Might Also Like: A note about ingredients used in our recipes: When creating our recipes we use the following unless otherwise noted in the recipe: Eggs = Large Eggs All Purpose Flour = Unbleached All Purpose King Arthur Flour or Unbleached All Purpose King Arthur Flour Organic Bread Flour = Unbleached King Arthur Bread Flour or Unbleached King Arthur Bread Flour Organic Whole Wheat Flour = 100% Whole Grain King Arthur Whole Wheat Flour Pastry Flour = Bob’s Red Mill Unbleached White Fine Pastry Flour Almond Flour = Bob’s Red Mill Super-Fine Almond Flour Tapioca Flour = Bob’s Red Mill Tapioca Flour (Tapioca Starch) Sour Cream = Full Fat Sour Cream Yogurt = Full Fat Yogurt Milk = As indicated or if Milk is just listed you may use 1%, 2% or Whole Milk Butter = Unsalted Sweet Cream butter unless otherwise noted Oil = Either Olive oil or Vegetable oil unless otherwise noted Tags: Beef Enchilada, Cooking, Enchiladas, Savory, How to make enchiladas Categories: Beef
- Pie Crust with Oil
ALL RECIPES BAKING RECIPES CANDY RECIPES COCKTAIL RECIPES COOKING RECIPES Create Account Questions Recipes Video Classes Zoom Classes Pie Crust with Oil 15 mins 2 single crusts Recipe you are creating: Pie Crust with Oil Oil is easy to incorporate into pie dough and since it’s in liquid form, it won’t melt while you’re working your dough. The downside is your crust won’t be as flaky as using one of the other fat types. Recipe Ingredients: 1 3/4 cups unbleached flour 1 teaspoon salt 1/2 cup oil (cannola, avocado or vegetable) 3 to 4 tablespoons cold water Recipe Directions: Measure flour and salt into a medium bowl. Add oil. Mix until pieces are the size of small peas. Sprinkle water, 1 tablespoon at a time and mix with the flour until flour is moistened and dough almost cleans the side of the bowl. Form the mixture into a loosely formed ball. Add more water if needed to mold the dough. Turn the dough out onto a floured work surface and gently knead into a ball. Divide the ball into halves and shape each half into a 4 inch circle. Wrap the dough in waxed paper or plastic wrap. Refrigerate for 30 minutes to 1 hour. Return the dough rounds to the floured surface, roll out one of the discs of dough into a circle. Turn the dough gently as you work. Center your pie pan upside down on the circle of dough and roll it out until it is about 2 inches larger than the edges of the pan. Carefully transfer it to the pie pan, rolling it up onto your rolling pin to move it. You can also fold it gently into quarters and place the point in the center and unfold it over the pie pan. Press the dough gently into the pan; trim away any excess dough, and patch any holes. Leave about 1/2 inch beyond the edge of the pie pan. Fold the edges up and over and crimp edges using a fork or your finger. Refrigerate the crust until needed. You can make in advance. Wrap the dough well in plastic and refrigerate for up to 3 days or freeze for up to 2 months. You Might Also Like: Baking Classes You Might Like! Tags: Pie Crust with Oil, Pie Crust, Pie Crust Recipe, How to make pie crust with oil, Dessert, Sweet, Savory, Pie Making, Pie Recipe, Pie Making Recipe Categories: Pie Making, Pastry
- Lime & Poppy Seed Cupcakes
ALL RECIPES BAKING RECIPES CANDY RECIPES COCKTAIL RECIPES COOKING RECIPES Create Account Questions Recipes Video Classes Zoom Classes Lime & Poppy Seed Cupcakes 15 mins 2 dozen Recipe you are creating: Lime & Poppy Seed Cupcakes This recipe was sent to us by Rebekah Allan, of Angel Cakes. This perfect summer cupcake combines the flavors of vanilla and lime. It also has some unique ingredients (like corn flour!) and is garnished with poppy seeds. Try it out and let us know what you think! Recipe Ingredients: Batter: 200 grams unsalted butter 220 grams sugar Zest of 2 limes 3 eggs 1 teaspoon vanilla extract 1⁄2 teaspoon salt 300 grams self rising flour 75 grams corn flour 1 cup milk 40 grams poppy seeds Buttercream Icing: 250 grams unsalted butter 500 grams powdered sugar Juice of 1 small lime Lime Syrup: 220 grams bakers sugar Recipe Directions: Preheat oven to 175 degrees. Soften butter to room temperature, add sugar and lime zest and beat for 3 minutes. Add eggs, vanilla and salt, mixing on slow speed until incorporated. Sift in flour; add poppy seeds and milk, mix on slow speed until incorporated, scrape down sides of bowl and mix on medium for 30 seconds. Spoon mixture into cupcake papers; bake for 35 min or until tooth pick comes out clean. Cool. To make Lime syrup – Combine sugar and juice in a small saucepan over medium heat; stir until sugar dissolves; bring to a boil and simmer for 5 minutes until thickens slightly. Spoon over cupcakes. To make butter cream – soften butter to room temp and add to mixing bowl with icing sugar & lime juice. Beat for 3-5 minutes until light. Pipe onto cupcakes. You Might Also Like: Classes you might like! Tags: Lime & Poppy Seed Cupcakes, Cupcakes, How to bake cupcakes, Poppy Seed Cupcakes, Dessert, Sweet, Poppy Seed Cupcake Recipe, Lime Poppy Seed Cupcake Recipe, Lime Poppy Seed Muffin Recipe, Sweet Bread Categories: Cupcake, Cake, Muffin, Bread
- Shamrock Pretzels
ALL RECIPES BAKING RECIPES CANDY RECIPES COCKTAIL RECIPES COOKING RECIPES Create Account Questions Recipes Video Classes Zoom Classes Shamrock Pretzels 10 mins 12 Recipe you are creating: Shamrock Pretzels Learn how to make fun chocolate covered pretzels shaped like shamrocks! Perfect for a St Patrick's Day celebration! Recipe Ingredients: You will need two kinds of pretzels Coating chocolate Your favorite sprinkles and diamond dust Our rainbow sugar lay-ons Recipe Directions: You Might Also Like: A note about ingredients used in our recipes: When creating our recipes we use the following unless otherwise noted in the recipe: Eggs = Large Eggs All Purpose Flour = Unbleached All Purpose King Arthur Flour or Unbleached All Purpose King Arthur Flour Organic Bread Flour = Unbleached King Arthur Bread Flour or Unbleached King Arthur Bread Flour Organic Whole Wheat Flour = 100% Whole Grain King Arthur Whole Wheat Flour Pastry Flour = Bob’s Red Mill Unbleached White Fine Pastry Flour Almond Flour = Bob’s Red Mill Super-Fine Almond Flour Tapioca Flour = Bob’s Red Mill Tapioca Flour (Tapioca Starch) Sour Cream = Full Fat Sour Cream Yogurt = Full Fat Yogurt Milk = As indicated or if Milk is just listed you may use 1%, 2% or Whole Milk Cream = 40% Heavy Cream Butter = Unsalted Sweet Cream butter unless otherwise noted Tags: Treats, Pretzels Categories: Sweet and Salty Treats
- Homemade Strawberry Jam
ALL RECIPES BAKING RECIPES CANDY RECIPES COCKTAIL RECIPES COOKING RECIPES Create Account Questions Recipes Video Classes Zoom Classes Homemade Strawberry Jam 20 mins 4-5 Half-Pint Jars Recipe you are creating: Homemade Strawberry Jam Here’s how to make strawberry jam at home using fresh strawberries and a few pantry basics. You’ll start with clean, hulled strawberries and blitz them into a smooth puree. If you don’t like seeds in your jam, strain the puree using a fine mesh sieve. You’ll get a silky texture that’s perfect for spreading. Heat the puree with a splash of lemon juice and a little rum (optional but adds great depth). Mix your sugar with apple pectin before slowly adding it in. Stir consistently to keep the mixture smooth and lump-free. Let it cook until thickened. That’s it—your homemade strawberry jam is ready. This method is simple and works well if you’re prepping jam ahead for a tart or just want a solid, go-to fridge jam. Skip the store-bought stuff. Make your own. It tastes better. Recipe Ingredients: 4½ cups fresh strawberries, hulled 1 tbsp lemon juice 1 tbsp dark rum (optional) ¾ cup granulated sugar 1 tbsp apple pectin Recipe Directions: Blend the strawberries into a smooth puree using a blender or food processor. Strain the puree through a fine mesh sieve to remove seeds. Pour the strained puree into a saucepan. Add lemon juice and rum. Heat over low to medium-low until it begins to simmer. In a separate bowl, whisk sugar and pectin together. Slowly sprinkle the mixture into the simmering puree while stirring constantly. Cook for 4–5 minutes, stirring often, until the jam thickens. Remove from heat. Cool slightly, then pour into clean jars. Refrigerate or process for canning. Store in the fridge. Use within a week or freeze for later. You Might Also Like: Tags: strawberry jam recipe, how to make strawberry jam, strawberry jam, how to make jam, strawberry filling, homemade strawberry jam, easy strawberry jam, quick strawberry jam, how to make strawberry jam at home., homemade strawberry filling, strawberry filling recipe, easy and delicious strawberry jam, homemade strawberry jam recipe, jam recipes, quick easy strawberry jam, quick strawberry jam recipe Categories: Cake, Cookie, Cake Decorating, Cookie Decorating, Pastry, Pie, Pie Making
- Halloween Candy Bark 3 Ways
ALL RECIPES BAKING RECIPES CANDY RECIPES COCKTAIL RECIPES COOKING RECIPES Create Account Questions Recipes Video Classes Zoom Classes Halloween Candy Bark 3 Ways 20 mins 4 Recipe you are creating: Halloween Candy Bark 3 Ways Looking for a fun and delicious way to celebrate the holidays? Look no further than Candy Bark! In this video, we'll show you how to make Candy Bark three ways, so you can enjoy this festive treat any time of year! Recipe Ingredients: Coating Chocolate in various colors Purple Fusion Sprinkles , Halloween Sprinkle Mix , Pink & Green Retro Sprinkle Mix Candy Bark Candy Kit Recipe Directions: Melt and spread your candy coating on to a parchment lined baking sheet. Add your sprinkles and sugar decorations. Let harden. Break into pieces and enjoy! You Might Also Like: Halloween Sprinkle Mix Buy Now Halloween Candy Bark Kit Buy Now Tags: Halloween Candy Making Recipe, Candy Making Categories: Kids, Misc Treats, No Bake, Seasonal